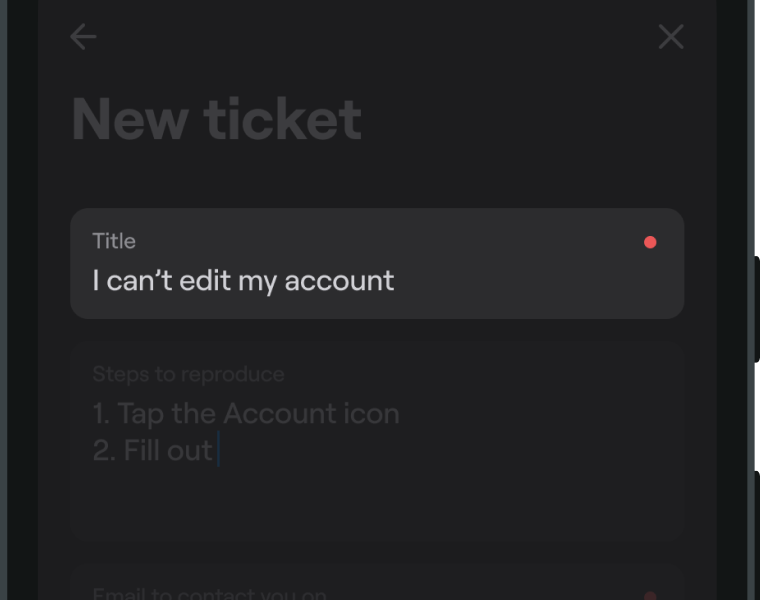
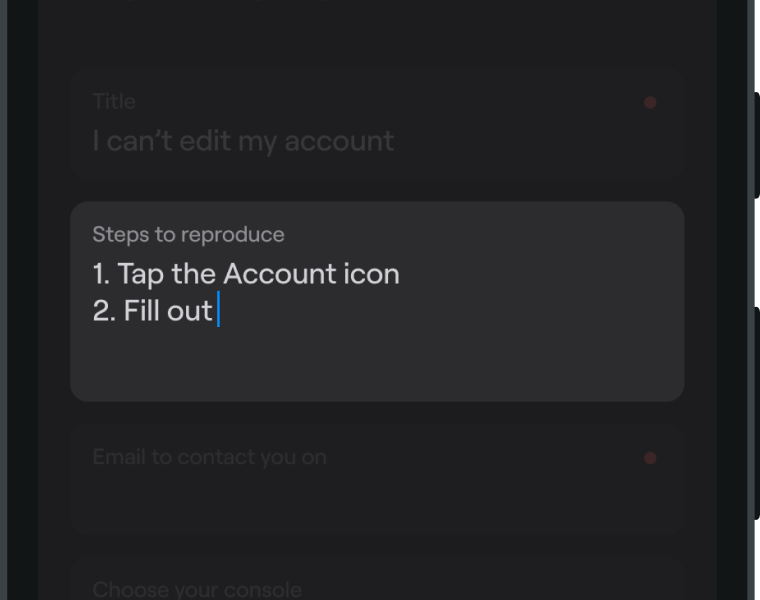
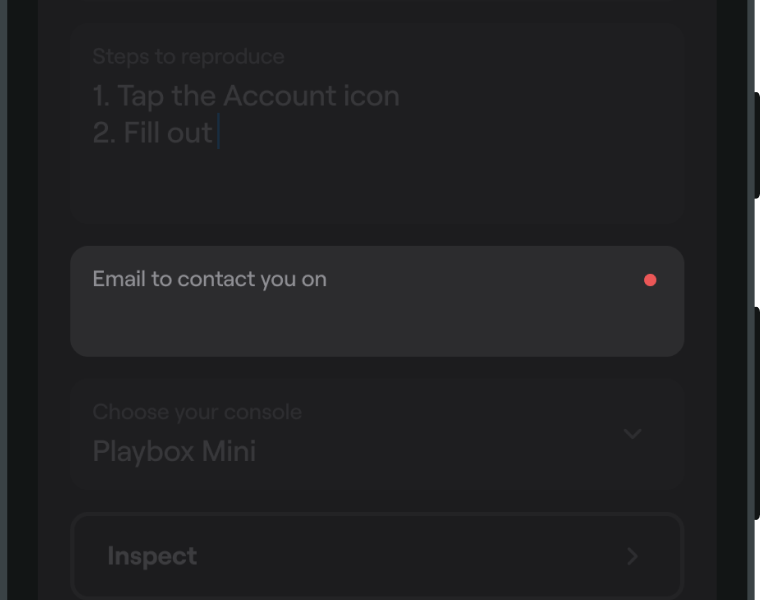
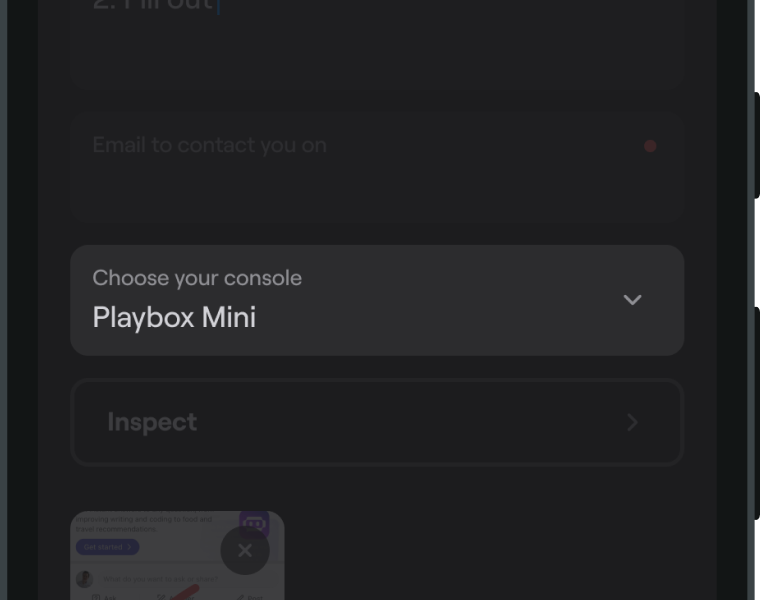
Custom forms
Learn how to create or modify a form displayed on the New ticket screen.
You're viewing the iOS docs. Other platforms → Android React Native Flutter Web
Default form
Shake provides a default feedback and crash reporting form that enables users to submit valuable input to the reported tickets. This pre-designed form includes a variety of useful elements for collecting detailed information from the user.
-
Title The form requires the user to provide a title for their ticket, ensuring that the issue is shortly described. This field is mandatory, meaning that users cannot submit a ticket without providing a title.
-
Feedback type Users can also select the type of feedback they are submitting, choosing from a several categories: bug, question, or suggestion. This categorization helps dashboard users to quickly identify and prioritize tickets based on their type.
-
Inspect button In addition, users have the option to inspect the data collected by the Shake by clicking the Inspect button. This feature provides users with an overview of the information they have submitted and helps to ensure that all the necessary details have been provided.
-
Attachments The form includes the option to attach additional files, such as screenshots or video recordings, to the ticket. This allows users to provide more detailed information about the issue they are reporting and can help support devs to quickly identify and resolve the problem.
Custom form
Depending on your requirements, you may want to customize the form to collect additional or specific data from your users. Shake offers several customizable elements that can be added to the Shake form:
-
Title This element allows users to provide a short and descriptive title for their ticket, helping to quickly identify and understand the nature of the submission.
-
Text input This element captures additional information beyond the title, allowing users to provide more detailed information about their submission. This can include descriptions, comments, or other relevant details.
-
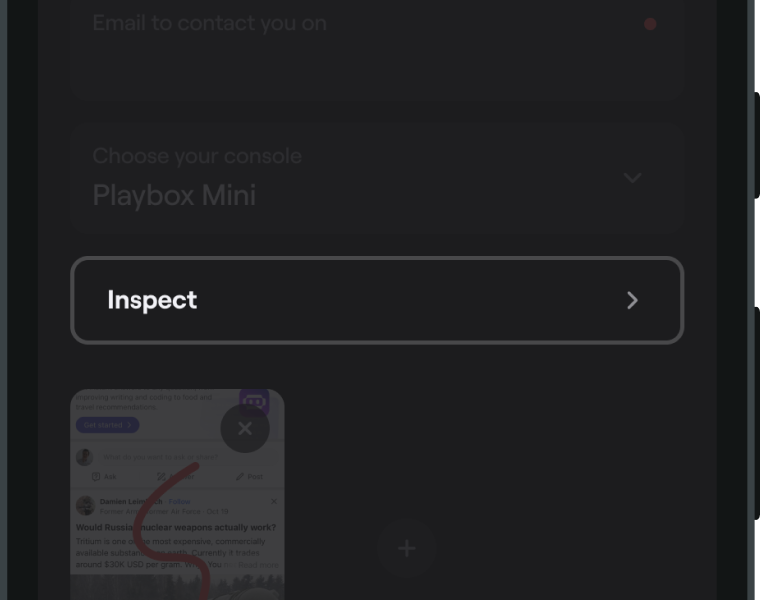
Email input This element accepts email input only, allowing users to provide their email address for follow-up communication or account verification. This can be particularly useful when addressing account-specific issues or when users want to be kept up-to-date on the status of their submission.
-
Picker This element allows you to define a set of options for the user to select from, helping to streamline the submission process and ensure that submissions are properly categorized for easier management and resolution.
-
Inspect button This element lets users easily review and verify the data they have provided for their submission, helping to reduce the need for follow-up questions and ensure that all necessary information has been included.
-
Attachments This element allows users to attach files or other relevant materials to their submission, providing additional context and information to help facilitate resolution. This can include images, videos, documents, or other relevant files.
Note that the Title, Inspect button, and Attachments elements can only be added to the form one-time. If multiple instances of these components are included, only the first instance will be displayed on the screen
Title
A component that lets users provide a short and descriptive title for their issue or request.
Properties:
- key String - represents element on the Shake dashboard
- label String - user facing label (use NSLocalizedString to show the localized version of your label)
- initialValue String - initial input value
- required Bool - if true, user can't submit the ticket while the input is empty
Example:
- Objective-C
- Swift
SHKTitle *title = [[SHKTitle alloc] initWithKey:@"title" label:@"Title" required:true initialValue:nil];
let title = SHKTitle(key: "title", label:"Title" required: true, initialValue: nil)
Here's a tip that quality assurance teams often find helpful. If #some #hashtags are added anywhere in the title, they will automatically become on your Shake dashboard.
Text input
This element allows your users to leave textual input with the ticket they're submitting.
Properties:
- key String - represents element on the Shake dashboard
- label String - user facing label (use NSLocalizedString to show the localized version of your label)
- initialValue String - initial input value
- required Bool - if true, user can't submit the ticket while the input is empty
Example:
- Objective-C
- Swift
SHKTextInput *description = [[SHKTextInput alloc] initWithKey:@"steps_to_reproduce" label:@"Steps to reproduce" required:false initialValue:nil];
let description = SHKTextInput(key: "steps_to_reproduce", label:"Steps to reproduce" required: false, initialValue: nil)
Email input
This element allows your users to leave email address with the ticket they're submitting.
Properties:
- key String - represents element on the Shake dashboard
- label String - user facing label (use NSLocalizedString to show the localized version of your label)
- initialValue String - initial input value
- required Bool - if true, user can't submit the ticket while the input is empty
Example:
- Objective-C
- Swift
SHKEmail *email = [[SHKEmail alloc] initWithKey:@"email" label:@"Email" required:true initialValue:nil];
let email = SHKEmail(key: "email", label: "Email to contact you on", required: true, initialValue: nil)
Picker
This element enables your users to select an option from a pre-defined list of choices.
Picker item
Properties:
- key String - represents element on the Shake dashboard
- text String - user facing label (use NSLocalizedString to show the localized version of your label)
- icon UIImage - represents picker item icon
- tag String - if item is selected, tag will be automatically added to the ticket
Example:
- Objective-C
- Swift
SHKPickerItem *pickerItem = [[SHKPickerItem alloc] initWithKey:@"playbox_mini" text:@"Playbox Mini" icon:[UIImage imageNamed:@"playbox"] tag:@"playbox-mini"];
let pickerItem = SHKPickerItem(key: "playbox_mini", text: "Playbox Mini", icon: UIImage(named:"playbox"), tag: "playbox-mini")
Picker
Properties:
- key String - represents element on the Shake dashboard
- label String - user facing label (use NSLocalizedString to show the localized version of your label)
- items List - list of items in the picker
Example:
- Objective-C
- Swift
SHKPicker *picker = [[SHKPicker alloc] initWithKey:@"console_picker label:@"Choose your console" items:@[pickerItem]];
let picker = SHKPicker(key: "console_picker" label: "Choose your console", items: [pickerItem])
Inspect button
This element allows your users to inspect ticket data, tapping it takes them to the Inspect section.
Example:
- Objective-C
- Swift
SHKInspectButton *inspect = SHKInspectButton.new;
let inspectButton = SHKInspectButton()
Attachments
This element allows your users to attach additional images, videos or files to the ticket.
Example:
- Objective-C
- Swift
SHKAttachments *attachments = SHKAttachments.new;
let attachments = SHKAttachments()
Examples
Creating a custom form
The code snippet below provides an example of how to create a custom form with a range of useful elements
- Title
- Description (Text input)
- Email (Email input)
- Category (Picker)
- Inspect button
- Attachments
The Title and Description fields are required and cannot be left blank, while the Email field is optional and includes a predefined value that users can modify or delete as needed. The Category field allows users to select a category for their ticket, which creates a corresponding tag to help with organization and management. The Inspect button allows users to easily review and verify the data they have provided for their submission, while the Attachments enables users to upload additional files or other materials to provide context and support their submission.
- Objective-C
- Swift
SHKShake.configuration.form = [[SHKForm alloc] initWithItems:@[[[SHKTitle alloc] initWithKey:@"title"label:@"Title"required:trueinitialValue:nil],[[SHKTextInput alloc] initWithKey:@"description"label:@"Description"required:trueinitialValue:nil],[[SHKEmail alloc] initWithKey:@"email"label:@"Email"required:falseinitialValue:@"john.doe@gmail.com"],[[SHKPicker alloc] initWithKey:@"feedback_type"label:@"Feedback type"items:@[[[SHKPickerItem alloc] initWithKey:@"bug"text:@"Bug"icon:niltag:nil],[[SHKPickerItem alloc] initWithKey:@"suggestion"text:@"Suggestion"icon:niltag:nil],[[SHKPickerItem alloc] initWithKey:@"question"text:@"Question"icon:niltag:nil],]],SHKInspectButton.new,SHKAttachments.new]];
Shake.configuration.form = SHKForm(items: [SHKTitle(key: "title", label: "Title", required: true, initialValue:nil),SHKTextInput(key: "description", label: "Description", required: true, initialValue:nil),SHKEmail(key: "email", label: "Email", required: true, initialValue: "john.doe@email.com"),SHKPicker(key: "feedback_type", label: "Feedback type", items: [SHKPickerItem(key: "bug", text: "Bug", icon: nil, tag: nil),SHKPickerItem(key: "suggestion", text: "Suggestion", icon: nil, tag: nil),SHKPickerItem(key: "question", text: "Question", icon: nil, tag: nil)]),SHKInspectButton(),SHKAttachments(),])
Using multiple custom forms
Sometimes, you’ll want to display different Shake forms for different use cases within your app. For example, you might want to show one form layout when the user taps the Report a bug button, and a different layout when they tap the Send feedback button.
You can accomplish this using Shake’s custom forms, as shown in the example below:
- Objective-C
- Swift
- (void)onBugReportClick {SHKShake.configuration.form = [[SHKForm alloc] initWithItems:@[[[SHKTitle alloc] initWithKey:@"title"label:@"Title"required:trueinitialValue:nil],[[SHKTextInput alloc] initWithKey:@"repro"label:@"Repro steps"required:trueinitialValue:nil],[[SHKEmail alloc] initWithKey:@"email"label:@"Email"required:falseinitialValue:@"john.doe@gmail.com"]]];}- (void)onSendFeedbackClick {SHKShake.configuration.form = [[SHKForm alloc] initWithItems:@[[[SHKTitle alloc] initWithKey:@"title"label:@"Title"required:trueinitialValue:nil],[[SHKTextInput alloc] initWithKey:@"like"label:@"What do you like most about the app?"required:trueinitialValue:nil],[[SHKTextInput alloc] initWithKey:@"dislike"label:@"Is there anything you dislike about the app?"required:trueinitialValue:nil],[[SHKEmail alloc] initWithKey:@"email"label:@"Email"required:falseinitialValue:@"john.doe@gmail.com"]]];}
func onBugReportClick() {Shake.configuration.form = SHKForm(items: [SHKTitle(key: "title", label: "Title", required: true, initialValue:nil),SHKTextInput(key: "repro", label: "Repro steps", required: true, initialValue:nil),SHKEmail(key: "email", label: "Email", required: true, initialValue: "john.doe@email.com"),])}func onSendFeedbackClick() {Shake.configuration.form = SHKForm(items: [SHKTitle(key: "title", label: "Title", required: true, initialValue:nil),SHKTextInput(key: "like", label: "What do you like most about the app?", required: true, initialValue:nil),SHKTextInput(key: "dislike", label: "Is there anything you dislike about the app?", required: true, initialValue:nil),SHKEmail(key: "email", label: "Email", required: true, initialValue: "john.doe@email.com"),])}
Change default feedback type
By default, the Shake form’s feedback type picker is set to Bug. However, you can change this to any other feedback type you prefer.
For example, if you want to set Suggestion as the default option instead of Bug, you can do it like this:
- Objective-C
- Swift
NSArray<id<SHKFormItemProtocol>> *defaultFormItems = SHKShake.configuration.form.items;NSMutableArray<id<SHKFormItemProtocol>> *newItems = [defaultFormItems mutableCopy];for (NSUInteger i = 0; i < newItems.count; i++) {id item = newItems[i];if ([item isKindOfClass:[SHKPicker class]]) {SHKPicker *picker = (SHKPicker *)item;NSMutableArray<SHKPickerItem *> *pickerItems = [picker.items mutableCopy];// bug=0,suggestion=1,question=2SHKPickerItem *temp = pickerItems[0];pickerItems[0] = pickerItems[1];pickerItems[1] = temp;picker.items = pickerItems;}}SHKShake.configuration.form = [[SHKForm alloc] initWithItems:newItems];
let defaultFormItems = SHKShake.configuration.form.itemsvar newItems = defaultFormItemsfor (index, item) in newItems.enumerated() {if let picker = item as? SHKPicker {var pickerItems = picker.items// bug=0,suggestion=1,question=2let temp = pickerItems[0]pickerItems[0] = pickerItems[1]pickerItems[1] = temppicker.items = pickerItems}}SHKShake.configuration.form = SHKForm(items: newItems)
Creating a form translated to different languages
The following code snippet is an example of how to create a custom form that includes elements with labels translated into different languages.
To achieve this, you can leverage resources strings, which are supported by the platform you are working on. For instance, you may want to have a text input for a required ticket title, as well as a text input for required reproduction steps where the user can describe how they encountered a bug.
shake_form_title and shake_form_repro are defined as strings in the resource files. Each language has its own resource file, and the system will automatically load the correct file depending on the language settings on the user's phone.
By utilizing resources strings, you can provide a seamless and localized experience for your users, regardless of their language preferences.
- Objective-C
- Swift
SHKTitle *title = [[SHKTitle alloc] initWithKey:@"title"label:NSLocalizedString(@"com.app.shakeTitle", @"")required:falseinitialValue:nil];SHKTextInput *repro = [[SHKTextInput alloc] initWithKey:@"repro"label:NSLocalizedString(@"com.app.shakeRepro", @"")required:falseinitialValue:nil];SHKShake.configuration.form = [[SHKForm alloc] initWithItems:@[title, repro]];
let title = SHKTitle(key: "title", label: NSLocalizedString("com.app.shakeTitle", ""), required: true, initialValue: nil)let repro = SHKTextInput(key: "repro", label: NSLocalizedString("com.app.shakeRepro", ""), required: true, initialValue: nil)Shake.configuration.form = SHKForm(items: [title, repro])
Removing Inspect button from the default form
If you like the default form but want to make some modifications, you can easily do so by editing the Shake default form. For example, you may wish to remove the Inspect button from the default form to prevent users from inspecting the ticket data, while keeping the other form elements intact.
- Objective-C
- Swift
NSArray<id<SHKFormItemProtocol>> *defaultFormItems = SHKShake.configuration.form.items;NSArray<id<SHKFormItemProtocol>> *filteredItems = [defaultFormItems filteredArrayUsingPredicate:[NSPredicate predicateWithBlock:^BOOL(id _Nullable evaluatedObject, NSDictionary<NSString *,id> * _Nullable bindings) {return [evaluatedObject isKindOfClass:SHKInspectButton.class];}]];SHKShake.configuration.form = [[SHKForm alloc] initWithItems:@[filteredItems]];
let customForm = SHKForm(items: Shake.configuration.form.items.filter({ item inreturn !(item is SHKInspectButton)}))Shake.configuration.form = customForm
